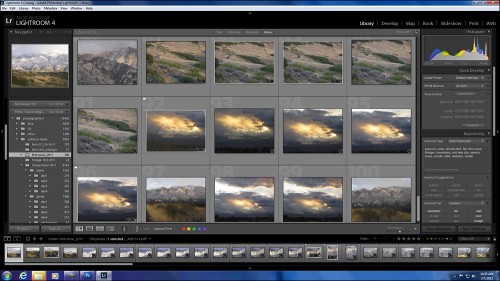
 Yesterday, Adobe announced the final version of their powerful Lightroom 4 photography workflow and editing software. There are a lot of significant improvements to Lightroom 4 but the most important change is the new price. In the past, Lightroom has sold for US $300 but Adobe lowered the price to $149 and $79 to upgrade from a previous version. It looks like the $79 upgrade price is also available to Lightroom 1 and 2 owners. With more and more photographers using Lightroom as their one and only digital photo editing program, the aggressive new pricing is should make Lightroom 4 the de facto do-it-all photography software for almost all serious photographers. Most of the improvements were announced with the Lightroom 4 beta, including the addition of new Book and Map modules, better video support; with soft proofing and enhanced selective adjustments added to the Develop module.
This article will go over the important new features of Lightroom 4 and then I’ll get into my own experience with it. If you want to skip the overview and videos and go straight to my thoughts on Lightroom 4, click here.
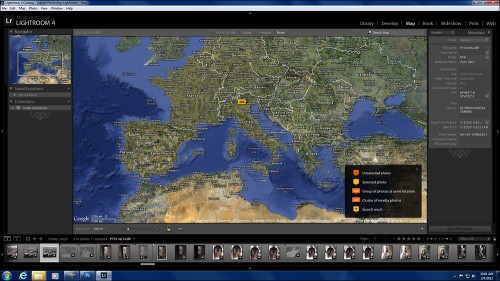
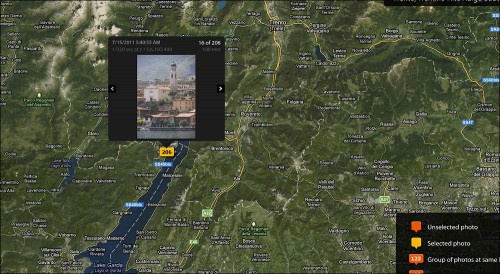
Lightroom 4’s new Book module allows you to create professional quality books right in Lightroom. It’s got all the layout tools you need right in the module. When you’ve got your book set up the way you want it, you can either export it and upload to your favorite photo book service, or upload directly from Lightroom to Adobe’s book partner, Blurb. The new Map module uses GPS data to locate photos and videos on a Google Map in the module so photos can be visually searched by location. Check the Adobe videos below for a short intro to Lightroom and demos of the new Book and Map modules.
Adobe Lightroom 4 Basic Intro Video:
Adobe Lightroom 4 Map Module Video Demo:
Adobe Lightroom 4 Book Module Video Demo:
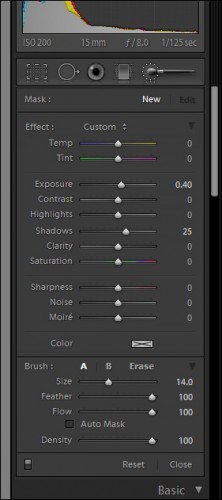
For experienced photographers and pros, the most important changes in Lightroom 4 are going to be the upgraded selective adjustment tools and soft proofing in the Develop module. Soft proofing allows you to check the color, exposure and contrast values of your images in the final output workspace so you can be sure your images will look correct in print, on the Web, in a slideshow, etc. I’m most excited about the improvements to the selective adjustment tools. In Lightroom 3, the Graduated Filter and Adjustment Brush tools offered only a limited set from the full pallet of Develop module tools. In Lightroom 4 you get a much larger set of exposure and image correction tools, including noise reduction, white balance adjustment and moiré correction. This makes Lightroom’s selective adjustment tools much more powerful and complete than they were in Lightroom 3. For a demonstration of how the improved selective adjustment controls can be used, check out the Adobe demo video below.
Adobe Lightroom 4 Develop Module Video Demo:
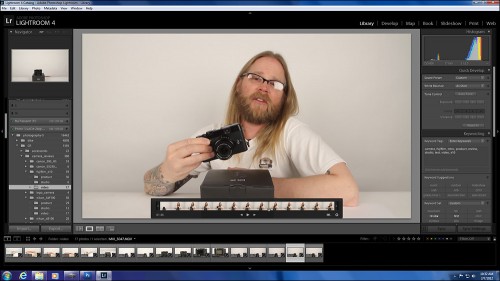
Video cataloging was added to Lightroom in version 3. But cataloging was all Lightroom 3 would do with your videos. Video still isn’t supported in the Lightroom 4 Develop module. But you can now play videos do frame grabs and trim videos right in the Library module window. You can also do some simple editing with the Quick Develop controls in the Library module or by applying presets. The Lightroom designers also came up with a very clever workaround for more sophisticated editing. If the basic presets and Quick Develop tools don’t get the job done, you can use a frame grab to create a new preset in the Develop module and then apply that preset to your video in the Library module. For more on the new video options in Lightroom 4, have a look at the Adobe video below.
Handling Video In Adobe Lightroom 4:
Photo-John’s Lightroom 4 First Impressions
First thing this morning, I downloaded and installed Lightroom 4 and updated my Catalog. Happily, my Catalog update appeared to go just fine and a quick look at some new product photos I shot this morning shows a slight but noticeable improvement in the quality of my Canon EOS 7D RAW files. The backend processing in Lightroom 4 is all new (Process Version 2012) so when you view an old image in the Develop module, an exclamation point icon appears at the lower right of the window indicating the image is from an old Process Version of Lightroom. When you click on the icon you can upgrade the image to the new Process Version. It gives you the option of seeing a before and after and my 7D studio images looked a bit brighter and at 100% there is a bit less noticeable noise. They are also slightly softer, but that’s pretty standard with reduced noise and it wasn’t enough of a difference for me to consider it a problem.
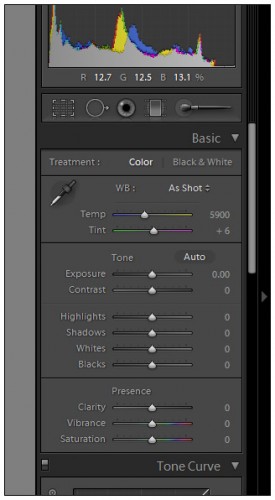
While upgrading photos to Process Version 2012 I noticed that some of the adjustment tool names and slider values in the Develop modules Basic window have changed – that’s the top section of the Develop module’s right panel, with the exposure, color and contrast adjustments. Those of you who are familiar with Lightroom will recall that some adjustments started at zero and some didn’t. It wasn’t clear or intuitive why they weren’t all given the same value scale and Adobe obviously decided to simplify things and make all the controls in the Develop module’s Basic window start at zero. I think the tool name changes were made for the same reason. Fill Light and Recovery are now Highlights and Shadows, and the Contrast adjuster has been moved up right underneath the Exposure slider. It’s probably going to take a little getting used to for those of us who’ve been using Lightroom for a long time but the changes should make the tools in the Basic panel more intuitive for new users.
Even though I don’t think it’s as important as the Develop module tools, I was excited to check out Lightroom 4’s new Map module. I got right in there and geotagged a bunch of photos I took in Italy, last summer during my honeymoon. It’s super easy to tag them and it’s really fun to be able to browse your photos on a map instead of just in galleries. You can even view them right on the map. If you click on a location with photos a little window pops up and you can scroll through all the photos attached to that place. I have a feeling the Map module is going to be more useful than I initially expected. Keep in mind that since the Map module uses Google Maps, you do need an Internet connection to use it.
The Lightroom 4 changes I was most excited about were the updates to the Develop module. I do most of my selective adjustments in Photoshop with masked adjustment layers. But the ability to selectively apply white balance and noise reduction to RAW files is very exciting. It’s not going to replace Photoshop masked adjustment layers for me. But the new tools mean I’ll have better files to start with in Photoshop, and I’m definitely going to take advantage of that. So I made it a point to play with the Adjustment Brush and sure enough, noise reduction is now one of the slider controls. So if I use the Adjustment Brush to selectively lighten up a shadow area with the exposure and shadow sliders, I can now compensate by also adding noise reduction within the mask created by the Adjustment Brush.
Besides experimenting with Lightroom 4, I was also shooting a video camera review yesterday (Fujifilm X10 – watch for it) so I had the opportunity to import some video files into Lightroom 4. I have to say, it’s very nice to be able to watch my video clips within Lightroom instead of having to open up Windows Media Player to watch them. It doesn’t seem like a big deal but that tiny bit of added efficiency is really nice. I didn’t mess with any of the new video editing options in Lightroom but I’m sure I will at some point and I’m really pleased that Lightroom is offering more video tools. The ability to manage all my photo and video files with the same program makes life a lot simpler.
Speed seems about the same as Lightroom 3 on my Windows 7 machine. I imported, viewed, zoomed and exported images and nothing seemed either faster or slower to me. The only issue I had was when I first tried to view videos in my updated Catalog; it looked like they might be corrupt. However, after restarting the program, all my videos were fine and I was able to view and play them within the Library module. I also talked to one other photographer who had some Catalog problems after updating. I suggested he try restarting and he had the same experience. After the restart all his image files were fine.
Conclusion
My first impressions of Lightroom 4 are very positive. I’m really pleased with the new video tools and the Develop module improvements. But I have to admit, the thing I like the most about Lightroom 4 is the Map module. I’m sure it’s going to be a valuable search tool down the road. But right now, scrolling around and adding my photos to the built-in Google Map is just plain fun. Lightroom has always been a powerful and sophisticated photography tool. But this is the first time I think it’s had a feature that I thought was fun.
With the price for the full version of Lightroom 4 cut in half, I have no doubt there are going to be a lot of new users this year. And there should be. Lightroom has become the de facto photo management and editing software for most serious photographers and working pros. And for good reason – it keeps track of all your photos and videos with a powerful, searchable database; and the processing and editing tools are excellent. Yes, there are alternatives to Lightroom and they have their benefits. But Lightroom has become the standard, general issue workflow software for most photographers. And with a 30-day fully-operable trial and full price of just $150, if you haven’t tried it yet, now’s the time.
Be aware that the minimum hardware and operating system requirements have changed for Lightroom 4. Mac users need a machine with OS 10.6.8 or higher and a 64-bit Intel processor. Windows users will need Windows Vista or Windows 7 to run the new software.
What do you think of Lightroom 4 and Lightroom in general? Let us know in the comments section, below.
Adobe Lightroom 4 Press Release >>
Related Content:
All Adobe Photo Software User Reviews
Photography Software Forum
All Adobe Photography Software News
Adobe Web Site


I tried the beta and liked it , I also bought LR4 as soon I heard it was available, good price and nice image quality !
I will continue to use Capture nx2 for most of my shooting done with the D300, for he sony nex5n, it will be LR4 all the time, I uninstalled the software from sony. I also have a canon s95 and it s nice to edit al raw formats from the same place. the new PV2012 processing with adobe default products nice natural color skins, whereas in CNX2 I always got weird skin colors, I’m really enjoying the control available in the developer section. the brush adjustments are nice but still not as easy as the u-point slection from cnx2 or the nik plugins.
I downloaded it and tried it last night. My first impressions are this:
1. I think it is slower. Maybe it is because I am working with an old catalog? I will have to see with a new import.
2. Blacks and highlights have more detail somehow.
3. I need to get used to the new controls. I was slow making adjustments. These might be more intuitive to use for a new user.
Print module: I bought this version mostly because of the ability to softproof. What I found in the print module is that the help didn’t tell me how to do this! I hunted for a magic button. Downloaded the new help modules. Searched every page of the printing help. Finally I watched a tutorial online by some guy. It turns out softproofing is done in Develop! With a magic button that I still can’t find. But you push “S” and it comes up. Once in there you can make a virtual “PROOF” So you adjustments made for printing do not effect your original file. It does render a pretty good impression of what the print will look like using the paper profile of your choice. The best part is you can adjust this on the fly. You are not in the print module of LR or PS and need to back out and do an adjustment. You just do it right there in the develop module. This is also done full screen. Instead of a small preview window. So you get a good feel for what you are doing. Instead of seeing blown highlights and blacks, LR gives you an out of gamut warning. This sort of sucks. You need to turn the softproofing off to see your blown highlights or blacks. This is something I find very important for printing. Maybe it is there in softproofing, but pressing “J” doesn’t do it and I can’t seem to find it on the histogram. Maybe it is somewhere.
I haven’t even talked about the print module yet. Because all of this stuff happens in the Develop module.
The Print Module is really the same as the old one. A little bit inflexible. No new border options, nothing I really hoped for. It does give you a neat feature of adjusting brightness and contrast. This is cool, but it doesn’t give you a preview of your change.
Exporting to the HD is about the same. Again, it might be slower. No new cool features here. Would be nice to add borders, or more than one watermark. It was sort of a let down. To do this you need to add morgrify.
Good upgrade just for the shadow detail and softproofing. I really wish they pumped up the print module a bit more. I would be really nice to see it easier to work with and have more options. But it is still the easiest way for me to print.
I am loving LR 4. I have not noticed any speed issues but then again, I don’t do the same kind of massive batch processing that Zerodog does. I did have an issue on a recent trip, though. I took the 5D Mk III and the Nikon D4 to shoot an event and downloaded LR 4 for my laptop because those cameras aren’t supported with Lightroom 3.6, which is what I have on the laptop. Once I was on the road I discovered that LR 4 is not compatible with Win XP, which is what I have on my laptop. So I had to shoot everything RAW+JPEG and my directory structure for the trip is a mess. This isn’t actually a LR problem, though – it’s a laptop problem. I realized that it’s time for me to start looking into upgrading my laptop again. I hate having to upgrade computers for new software but periodically, it has to be done.